Which RAM Slots to Use on Your Motherboard
By Marlo Strydom · Last updated



You have two new sticks of RAM and four empty slots. Guess wrong and nothing warns you. The PC boots just fine and quietly runs slower than it should.
The right spot is usually printed on the board itself, in letters small enough to miss. Here is how to read them, where any number of sticks should go, and how to prove you got it right.
The Short Answer
- Two sticks go in A2 and B2, the second and fourth slots counting out from the CPU.
- One stick goes in A2. Four sticks fill every slot but often run at a lower top speed.
- On a two-slot board or a laptop, fill both slots.
- Check the result in CPU-Z or our free RAM Optimizer, since Task Manager won't show the channel mode.
Find A2 and B2 on Your Board
Look for tiny labels beside the slots or near the CPU socket. They read something like DIMM_A2 or DDR5_B2. The letter is the channel, and the number is the slot within that channel.
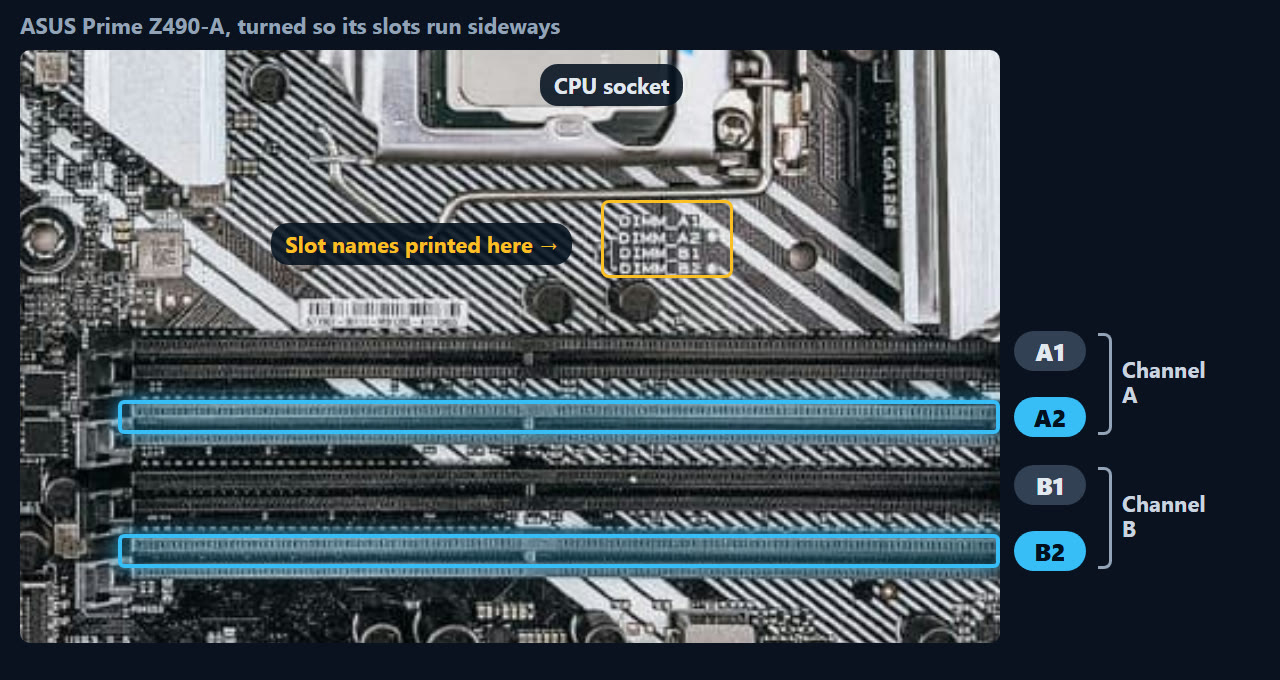
Can't read the labels? Count out from the CPU. ASUS's install guide puts two sticks in DIMM_A2 and DIMM_B2, the second and fourth slots on a four-slot board, and Corsair agrees.
Your manual has the final word. Kingston notes that the slots to fill first can change between Intel and AMD boards and between brands. Search your board's model on the maker's support site, or let our free PC Reporter tell you which board you have.
Why the Slot Choice Matters
Desktop Intel and AMD chips reach memory over two channels, A and B, with up to two slots on each. Kingston explains that the CPU can use sticks on both channels at the same time, adding their bandwidth together.
Two sticks in A1 and A2 both sit on channel A. The PC still boots, but it runs in single channel with half the bandwidth.
That costs real frames. TechSpot ran 13 games with one 16 GB stick and then with two, and the single stick was 12% slower on average at 1080p. Its 1% lows, the dips you feel as stutter, fell 16%.
Some games take a much bigger hit. In the same test, Marvel Rivals dropped from 195 to 129 FPS on one stick.
So why A2 and B2 rather than A1 and B1? Corsair says the gap they leave between the CPU and the memory helps airflow. Kingston adds that the first slots to fill are usually the ones farthest from the processor.
Where One, Three, or Four Sticks Go
| Sticks | Slots on a four-slot board | What you get |
|---|---|---|
| 1 | A2 | Single channel |
| 2 | A2 and B2 | Dual channel |
| 3 | A2, B2, plus one more | Part dual, part single channel |
| 4 | All four | Dual channel at a lower top speed |
One Stick
ASUS puts a single stick in DIMM_A2. That works fine for now, but you give up the second channel, so plan on adding a matching stick.
Three Sticks
Three sticks leave one channel holding more memory than the other. It's like pairing two sticks of different sizes, where Lenovo explains only the matched amount gets the dual-channel boost. Skip three if you can.
Four Sticks
Four sticks still run in dual channel, not quad. Kingston calls this the most common mix-up, and says a second stick on each channel often costs speed instead of adding it.
The drop is biggest with DDR5. Here is the top rated speed for standard DDR5 sticks under the Intel and AMD rules Kingston lists:
| Processor and board | Two sticks | Four sticks |
|---|---|---|
| Intel Core Ultra 200S, 800 series board | 5600 MT/s | 4400 MT/s |
| Intel 13th or 14th Gen, Z790 board | 5600 MT/s | 3600 to 4000 MT/s |
| AMD Ryzen 9000, X870 or X870E board | 5600 MT/s | 3600 MT/s |
For 64 GB, that makes a 2 × 32 GB kit the better buy than 4 × 16 GB. Adding a second pair to sticks you already own? Lenovo recommends matching the size, speed and timings, since mixed sticks run at the speed of the slowest one.
Still choosing a kit? Our RAM calculator works out how much memory you need and draws the slot map for your board. Computer Info Bits Pro saves that plan as a PDF to take shopping.
Two-Slot Boards, Laptops and Workstations
A board with only two slots, like many Mini-ITX boards, has one slot per channel. Fill both with a matching pair.
Laptops with two slots work the same way. If yours has memory soldered to the board plus one open slot, match the new stick's size to the soldered amount. Lenovo's dual-channel guide explains why: any extra memory on one side misses the boost.
Workstation chips have more channels. AMD lists four channels for its TRX50 Threadripper boards and eight for WRX90, so you need one stick per channel in the slots the manual shows.
Check That Dual Channel Is On
Task Manager shows how many sticks Windows sees, but not the channel mode. Open it, choose Performance, then Memory, and look at Slots used.
For the channel, open the Memory tab in the free CPU-Z app and read Channel #. With DDR4, it should say Dual.
DDR5 can look odd. Two sticks may show as 4 x 32-bit or even Quad, and that's normal, since each DDR5 stick splits into two 32-bit halves. One DDR5 stick shows as 2 x 32-bit.

If the PC Won't Start After the Move
A new DDR5 kit can leave the screen black for a while on the first start. Crucial says this memory training can take up to 15 minutes, so leave the PC on before you assume something broke.
Still nothing? Press each stick down until both clips snap shut, then try one stick in A2 by itself. If a stick or slot fails on its own, you've found the problem.
Once it boots, turn on XMP or EXPO in the BIOS. Fast kits run at a slower base speed until you do, as Intel's XMP page explains, and our XMP and EXPO steps show where the setting hides.
Related Posts