PC Airflow Optimization: How to Cool Your Computer (Fan Placement Guide)
PC airflow optimization means setting up your case fans to move cool air in and hot air out in the best way possible. Good airflow keeps your CPU, GPU, and other parts running cool, quiet, and lasting longer. Bad airflow traps heat inside your case, which causes thermal throttling, louder fans, and shorter hardware life.
The Quick Answer: Use 2-3 intake fans at the front of your case and 1-2 exhaust fans at the rear and top. Keep your total intake airflow about 10-20% higher than your exhaust airflow. This creates positive pressure, which cools your parts well and keeps dust out.
Your case fans are much stronger than gravity's pull on warm air. In a room with no fans, hot air floats up because it's lighter than cold air. But inside your PC, even a single 120mm fan spinning at 1000 RPM creates enough force to completely take over. This is why you can put exhaust fans at the bottom of a case and they still work great. The fan pushes harder than hot air wants to rise. Without any fans, even a PC with vents at the top would overheat. Modern computer parts can make over 200 watts of heat, and that's way too much for gentle rising air to handle. The lesson? Fan placement matters much more than hoping hot air will float away on its own.
How Case Airflow Works
Think of your PC case like a tunnel for wind. Cool air from your room needs to flow in, pass over hot parts, and then flow back out as warm air. When this flow is blocked or set up poorly, heat gets trapped around your computer parts. Your CPU and graphics card can get so hot they have to slow down to protect themselves.
One common airflow mistake is putting a desktop PC directly on carpet, which can block intake vents and pull in extra dust. See can you put a PC on carpet.
Most cases are built for air to enter at the front and exit at the back and top. This works because cool air is heavier and sinks, while warm air is lighter and rises. Your fans work with this natural flow to move air faster and more reliably.
If you want a quick starting point for intake and exhaust balance, try our PC airflow calculator.
Signs Your Airflow Needs Work
Here are common warning signs that your case cooling isn't working well:
- High idle temps: CPU above 158°F (70°C) or GPU above 176°F (80°C) when not doing much
- Loud fans: Fans running fast or loud all the time, even during simple tasks
- Quick dust buildup: Dust collecting in strange places or on unfiltered vents within weeks
- Hot spots: Some areas of your case feeling much hotter than others
- Crashes during games: Your computer shutting down or freezing during gaming or heavy work
- Big temp differences: More than 27°F (15°C) difference between the top and bottom of your case
The Three Types of Case Pressure
Case pressure means the balance between air coming in and air going out. Getting this balance right affects both cooling and dust control. There are three main setups you can choose from.
Positive Pressure
Acceptable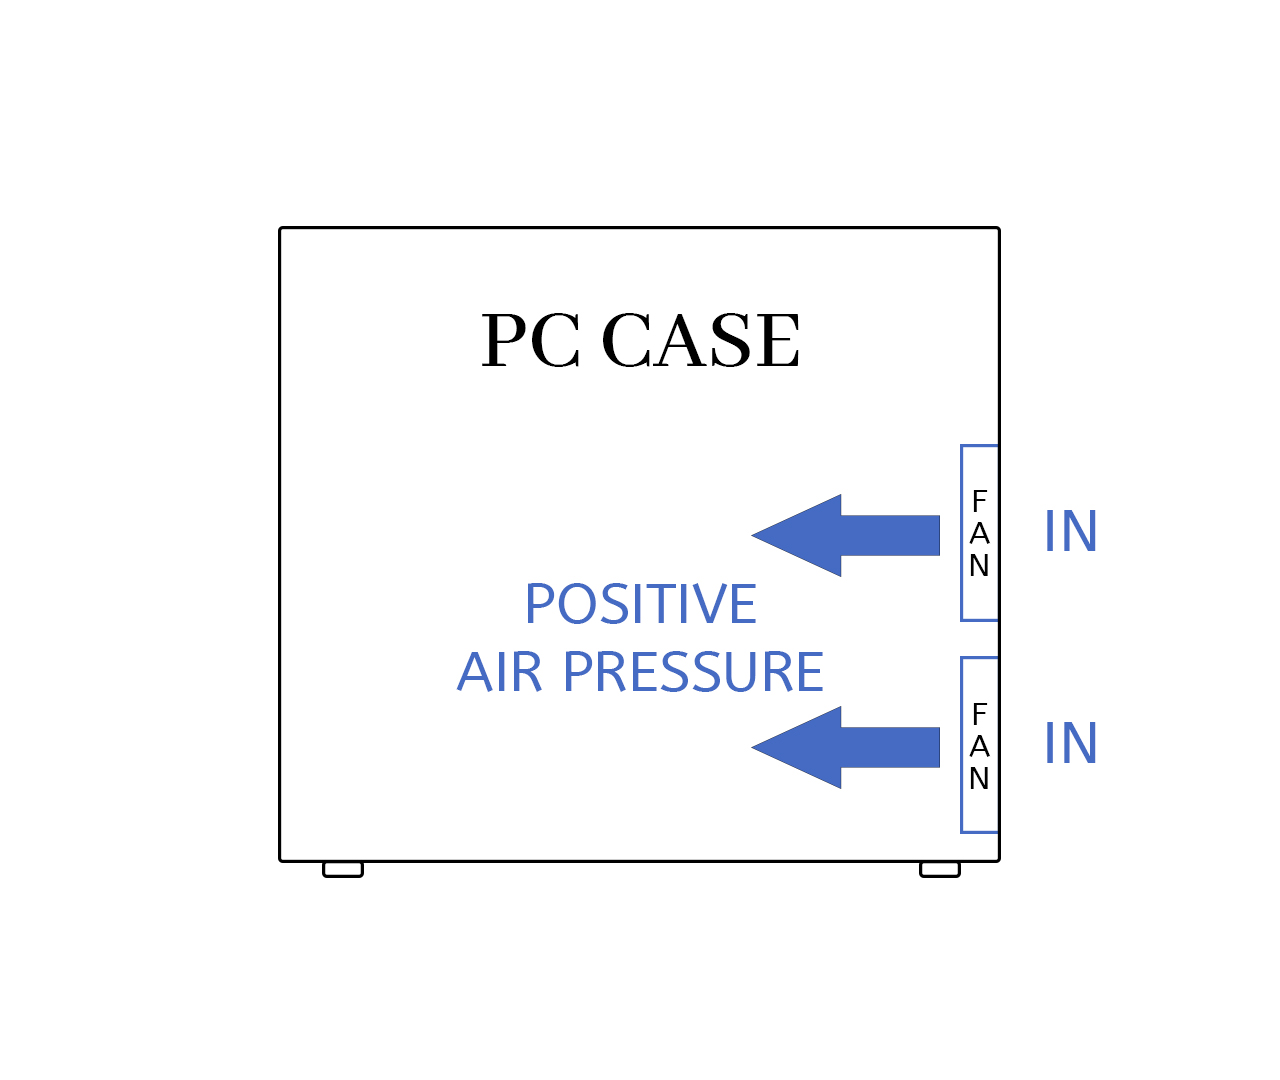
Positive pressure happens when your intake fans bring in more air than your exhaust fans push out. This extra air pressure pushes outward through every gap and crack in your case. Dust can only enter through your filtered intake fans, which makes cleaning easy.
Best for: Gaming PCs, everyday computers, and dusty rooms
- Great dust control through filtered intakes
- Steady cooling for all your parts
- Easy to maintain with filter cleaning
- Predictable airflow patterns
Negative Pressure
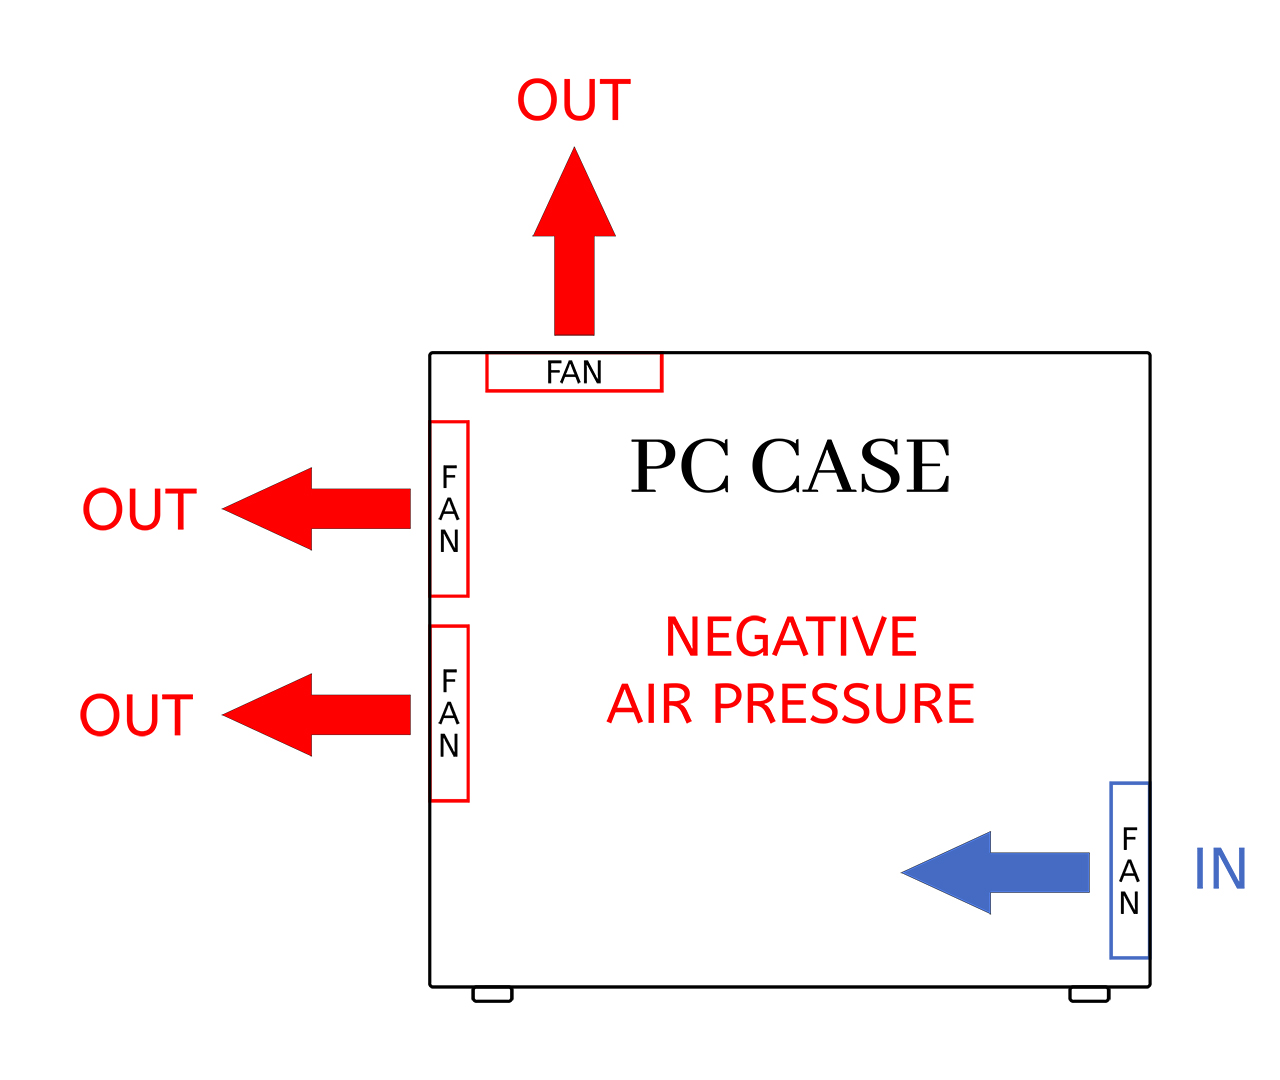
Negative pressure happens when your exhaust fans pull out more air than your intake fans bring in. This creates a vacuum effect that sucks air in through every opening in your case. The good news is that hot air leaves quickly. The bad news is that dust can sneak in through unfiltered gaps.
Best for: High performance builds with full dust filtration on all openings
- Fast removal of hot air from the case
- Good for cooling hard to reach spots
- Better cooling under extreme workloads
- Needs more frequent dusting inside the case
Slightly Positive Pressure
Recommended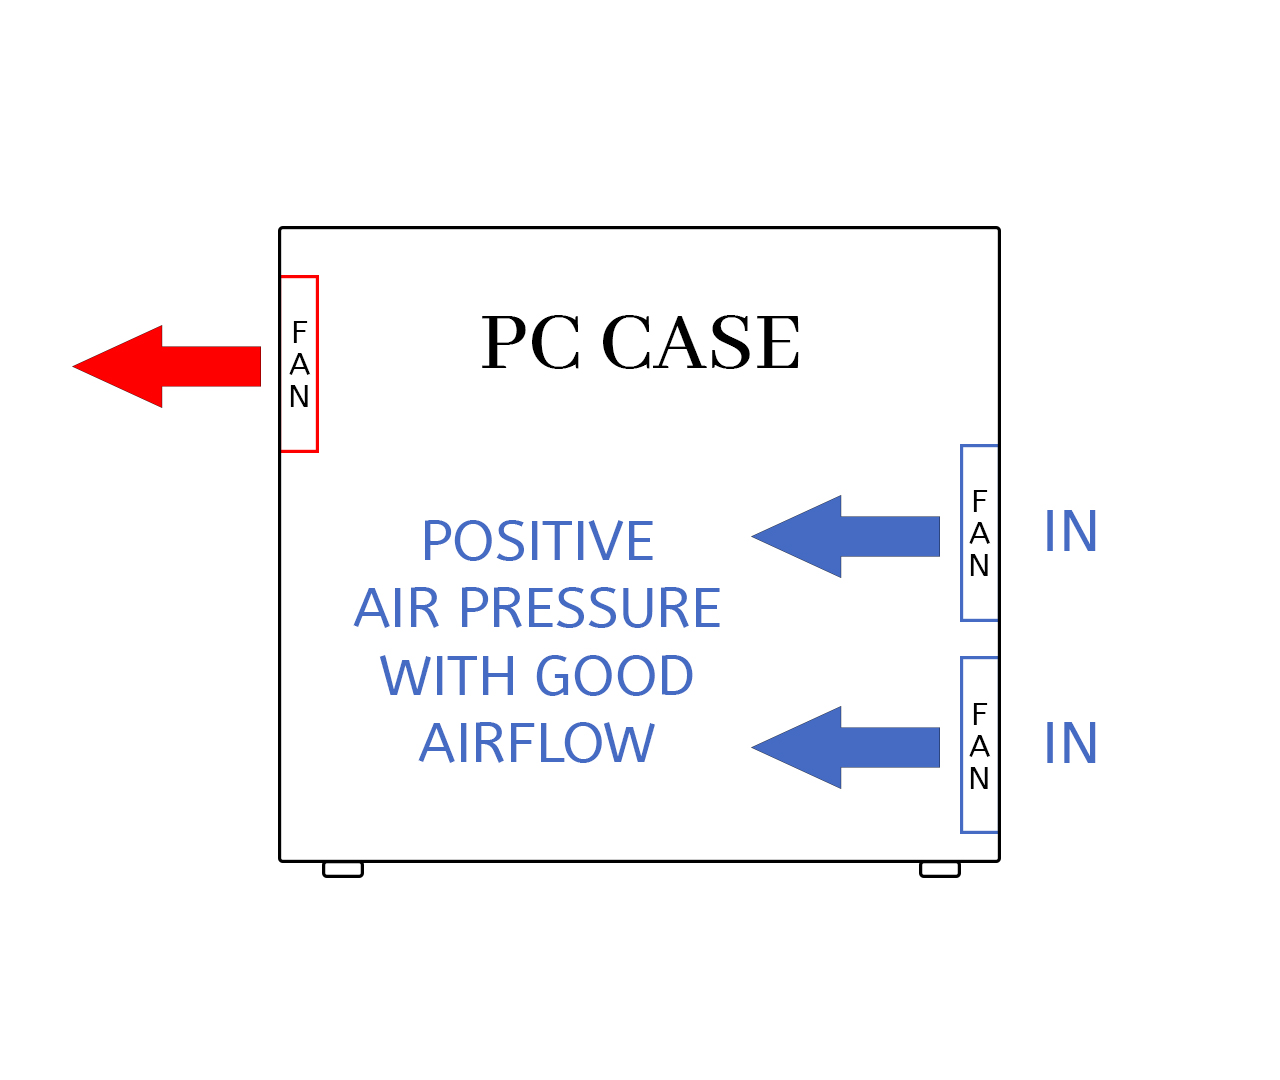
Slightly positive pressure means having just a bit more intake than exhaust, around 10-20% more CFM. This gives you the dust protection of positive pressure while still removing heat quickly. For most people building a gaming PC or workstation, this is the best choice.
Best for: Most gaming and work computers
- Good dust control with strong cooling
- Smooth and steady airflow
- Works well for almost any setup
- Easy to tune and adjust
Fan Placement Setups That Work
These fan layouts work well in most PC cases. Use them as starting points and adjust based on your specific case and parts.
Basic Setup (2-3 Fans)
- Minimum: One 120mm fan in front (intake) plus one 120mm fan in back (exhaust)
- Better: Two front intake fans plus one rear exhaust fan
- Goal: Keep intake CFM 10-20% higher than exhaust CFM
Mid-Tower Gaming Setup
- Front: Two 140mm intake fans with dust filters
- Rear: One 120mm exhaust fan
- Top: One 120mm exhaust fan (optional)
- Bottom: One 120mm intake fan pointing at your graphics card (if your case allows)
High Performance Setup
- Front: Three 120mm or two 140mm intake fans
- Top: Two 140mm exhaust fans, or a liquid cooling radiator
- Rear: One 120mm exhaust fan
- Side or Bottom: Extra intake fans for your graphics card if your case supports them
Free Ways to Improve Your Airflow
You can make your cooling better without buying anything new. These simple changes can drop your temps by 5-18°F (3-10°C).
Quick Fixes
- Check fan direction: Look at the arrows on each fan's frame to make sure they're pointing the right way
- Manage your cables: Route cables behind the motherboard tray so they don't block airflow
- Clean your filters: Wash or vacuum dust filters once a month
- Raise your PC: Lift your case a bit off the floor or carpet for better bottom intake
- Move your fans: Reposition fans to balance intake and exhaust better
Advanced Tweaks
- Custom fan curves: Set up your fans to speed up and slow down based on temperature
- Air channeling: Use cardboard or plastic guides to direct air toward hot spots
- Give parts room: Make sure there's space around your hottest components
- Add filters: Put quality dust filters on any unfiltered intakes
Cooling Specific Parts
Different computer parts need airflow in different ways. Here's how to cool each one well.
Graphics Card Cooling
Your graphics card often makes the most heat in your PC. It needs plenty of fresh air and a clear path for hot air to escape. If you're also seeing GPU performance issues, our guide on how to check if a GPU is working properly covers monitoring tools and common fixes.
- Direct feed: Point front or bottom intake fans right at your GPU
- Exit path: Make sure hot GPU exhaust can reach your rear or top exhaust fans
- Vertical space: Keep 2-3 expansion slot spaces open above your GPU
- Side clearance: Leave about 0.75-1.25 inches (20-30mm) between your GPU and the side panel
CPU Cooling
Your processor sits in the middle of your motherboard and needs consistent airflow to stay cool.
- Tower cooler direction: Point your CPU tower cooler to blow toward the rear exhaust fan
- Liquid cooling placement: Mount radiators as intake for cooler CPU temps, or as exhaust for cooler case temps
- VRM cooling: Make sure some air reaches the power delivery chips near your CPU socket
- RAM clearance: Don't let a big CPU cooler block airflow to your memory sticks
Testing Your Airflow
After making changes, you'll want to check if they actually helped. Here are ways to test your setup.
Temperature Monitoring
- Free software: Use programs like HWiNFO64, Core Temp, or MSI Afterburner to watch your temps
- Stress tests: Run Prime95 for CPU testing and FurMark for GPU testing
- Compare to room temp: Check how much hotter your parts run than your room
- Watch over time: Track temps for a few weeks to spot any problems
Physical Tests
- Tissue test: Hold a small piece of tissue near vents to see which way air moves
- Feel for hot spots: Carefully feel different areas of your case (while running) to find hot zones
- Watch fan speeds: See how fast your fans spin during different tasks
- Check dust patterns: Look at where dust collects to understand your actual airflow paths
Safety Warning: Never use smoke, incense, or other particles to test airflow near your computer. These can damage sensitive electronics. Stick to safe methods like the tissue test.
Common Airflow Mistakes
These mistakes can hurt your cooling without you realizing it. Avoid them to keep your PC running cool.
- Too many exhaust fans: Having more exhaust than intake creates negative pressure and pulls in dusty air through cracks
- Fans pointing wrong: Always check the arrow on your fan frame before installing
- Blocked front panel: Some cases have solid front panels that choke off intake air
- Fans fighting each other: Placing fans that blow against each other wastes their power
- Messy cables: Cables bunched up in the main chamber block airflow to your parts
- Parts too close together: Components packed tight can't get the airflow they need
- Dirty filters: Clogged dust filters can cut your airflow by half or more
Advanced Optimization
For enthusiasts who want to squeeze out every last degree, these advanced methods offer more control.
Fan Speed Control
- Custom fan curves: Create temperature based profiles that ramp fans up smoothly
- Control software: Use programs like Fan Control or your motherboard's BIOS settings
- Different profiles: Set up quiet modes for browsing and performance modes for gaming
- Temperature targets: Aim for 149-167°F (65-75°C) under load for most parts
Pro Level Methods
- Thermal camera: Use a thermal camera to find hot spots you can't feel
- Pressure testing: Measure air pressure at different spots in your case
- Airflow speed: Use an anemometer to measure actual air velocity
- Temperature mapping: Create detailed heat maps of your case interior
What Results to Expect
When you optimize your airflow properly, here's what kind of improvements you can expect.
Temperature Drops
- Basic fixes: 5-13°F (3-7°C) cooler CPU and GPU temps
- Balanced pressure setup: 9-18°F (5-10°C) drop with better dust control
- Full optimization: 14-27°F (8-15°C) improvement in high performance builds
- Fan curve tuning: Another 4-9°F (2-5°C) while also making things quieter
Other Benefits
- Less throttling: 15-25% better performance in tasks that were heat limited
- Longer hardware life: Cooler parts last longer and fail less often
- Better stability: Fewer crashes and shutdowns during heavy use
- Quieter operation: Fans don't need to spin as fast when airflow is good
Keeping Your Airflow Working Well
Good airflow needs regular care to stay effective. Here's a simple maintenance schedule.
Maintenance Schedule
- Monthly: Clean dust filters and check that fans are spinning
- Every 3 months: Open your case and clean dust from inside, check cable routing
- Every 6 months: Review your fan curves and temperature logs
- Yearly: Do a full airflow review and consider if any upgrades make sense
Wrapping Up
Good PC airflow optimization keeps your computer cooler, quieter, and more reliable. Start with the basics: make sure you have more intake than exhaust, keep your filters clean, and manage your cables. You don't need expensive equipment to make a big difference.
The key is balance. A slight positive pressure setup with filtered intakes works great for most people. Monitor your temperatures, test different setups, and adjust based on what your specific parts need. Your PC will thank you with better performance and a longer life.
Key Takeaway: Focus on balanced positive pressure, proper fan placement, and regular filter cleaning. Good cooling protects your investment and keeps everything running smoothly.